
SURFMAT ANATOMY
By Graeme Webster
We all look at these things called mats but there is often some mystery around what is inside these bubbles of air, what all the bits do and how these things that seem to defy logic actually work! Here we’re giving a bit of an overview of the different bits-and-bobs that make up the mat. You will notice that like all things, Surfmat design has it's own terminology. The term used were originally coined by Paul Gross, Dale Solomonson and George Greenough with many (eg channels) coming from the surfboard industry.
Before we look at aMatomy (sorry!) we’ll just cover a little bit on materials. Surfmats are basically made up of three parts. The Top Skin (or deck skin), the Bottom Skin and the I-beams. Quality modern mats are built using lightweight materials, usually nylon backed with Thermoplastic Polyurethane (TPU) which is both lightweight and airtight and can also be welded together either with heat or with high frequency sound waves. The end result of both methods is the same: an incredibly strong and clean bond.
TPU backed nylon
NB. When we talk about weight we are referring to the weave of the fabric, not the actual weight of the finished mat. Adding a rider to the back of any mat will make the odd ounce irrelevant. Lighter weaves give greater pliability which is why surfmat builders are so keen on it. As a general rule, heavier materials will give more hold and lighter materials will give more glide, all in conjunction with the dimensions of the mat of course. Also, the pliability of both skins and the I-beams affects the whole mat: eg. The bottom of a 200/70 mat (200 denier fabric on the deck and 70 denier on the bottom) with 70d I-beams will behave differently to the bottom of a 70/70 mat.
So then, on to the anatomy. With surfmats being inflatable, the job of the mat builder is twofold. Firstly, the surfmat is a hollow container which the builder uses to give a tangible, textured, shaped to the air pumped in to it. This interacts with the wave underneath it and the rider on top. Secondly, the mat builder is concerned with the internal venting of the mat. The freedom or restriction of air flow affects the responsiveness of the mat and the level of direct control that the rider has. So to summarise, building mats involves designing a surfcraft to a certain shape, and then working out how best to allow it to be warped out of shape again in the most functional way possible!
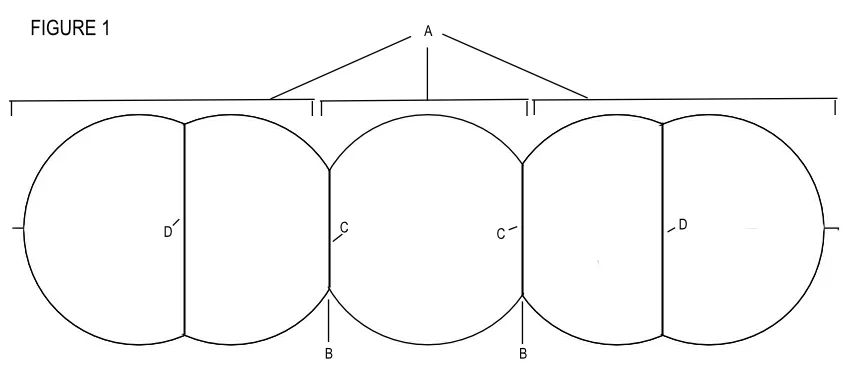
End-on cross-section of a 3 pontoon surfmat with stabilized outer pontoons and an un-stabilized central pontoon.
Pontoons are the tube like sections of the mat (see figure 1 A). Most modern mats have 3 or 4 pontoons.
Channels, or grooves, separate the pontoons. These help to add lateral hold and also act as pivot points when turning (see figure 1 B). The depth of these is measured by the difference between the height of the top of the pontoon and the bottom of the channel and is referred to as stagger. Mats with more stagger have pontoons which are more noticeably separate from one another.
I-Beams (see figure 2) are the internal structures which give the mat it’s shape (the wider inflatabls industry often refers to I-beams as baffles). Without I-beams your mat would be a perfectly round cylinder (A one pontoon mat if you will!) I-beams were named after a type of joist used in the construction industry, although our I-beams aren’t I shaped and also don’t carry loads but the name has stuck. I-beams fit into 2 categories:
a. Main I-beams, the smaller ones which separate the pontoons (see figure 1 C). Main I-beams affect the overall size of the pontoons and the positioning of channels.
b. Stabilizing I-beams which are larger and are used to shape the pontoons, such as flattening and thinning them out or adding hooks to rails (see figure 1 D).
Both Main and Stabilizing I-beams are essentially the same but their functions are very different. All mats will have main I-beams but some simpler designs will not have stabilizers. I-beams are usually cut in different ways to either increase or decrease the internal venting to restrict airflow (referred to as restricted-breathers or wheezers) or to allow air to move more freely (referred to commonly as free-breathers).
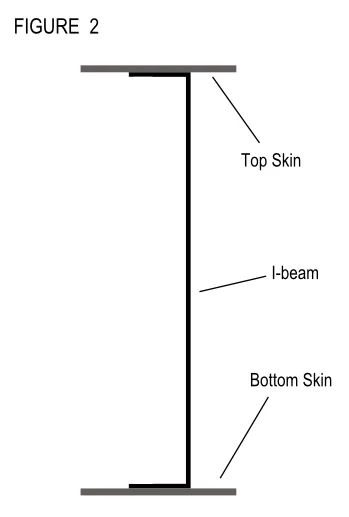
End-on view of an I-beam welded to outer skins.
Corners (see figure 3A) are one of the most complicated aspects of a surfmat:
Tail Corners: The general rule here is that round corners hold whereas square corners release. Therefore, if you have two otherwise identical mats, the one with square corners will have less hold but more speed and the one with round corners will have more hold but be slower. Rounded corners also make rail-to-rail turns easier.
Nose Corners: Rounded nose corners help to reduce the risk of catching a rail. However, an excessively round nose corner my cause problems with an overly loose tail. Again, the right balance for the mat and the rider are key.
Now before people say "but my round cornered mat is slippy" or "my square tailed mat holds in", please remember that this has to be considered in combination with other design aspects of each individual mat. What works in one way on one surfmat will be different on another. It is probably fair to say that corner templates cause mat builders more sleepless nights than perhaps any other aspect of mat design!
Flanges (also known as edge laps) are the seam around the outside of the mat where the top and bottom skins meet (see figure 3B). This accidental leftover of the manufacturing process has turned out to be a vital part of mat design. A fully inflated rail has a huge curve and years of testing by experienced mat builders has found that flange-free mats drag. The edge lap provides a shearing edge which compensates for this and allows the rail to release.
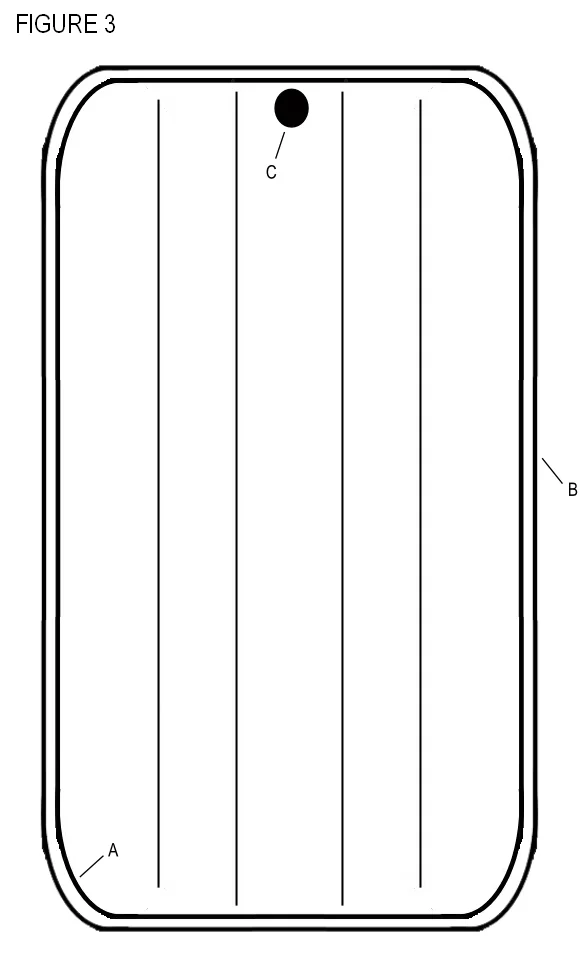
Plan view of the 3 pontoon mat shown in Figure 1.
There is still a comparatively large curve in operation though so mats have a lot of hold. Different mat builders have their own preferred edge lap width but there is certainly a Goldilocks Zone type window of tolerance: Too small and it doesn't work. Too big and it buzzes and causes turbulence.
Valves are the bit where you get air into and out of your mat (see figure 3C). These range in style from threaded valves to spring loaded valves to straight forward stopper and grommet designs. The latter isn’t technically a valve but as a generic term it’ll do!
Grip (AKA "deck grip") is applied to most lighter mats, such as G-Mat and Warpmats. The deck of the mat is masked off and then sealants are squeegeed on. This is usually then textured with something like a brush or roller. The more the coverage, the more the grip and also, the more stable the deck. Different sealants have different characteristics but the basic principle is the same for all of them.